Chatgpt delete chat

How to Delete All Chats on ChatGPT

If you use ChatGPT regularly, your chat history can pile up quickly. Whether you want a fresh start, more privacy, or simply less clutter, deleting your chats is easy. In this guide, you’ll learn exactly how to delete all your conversations on ChatGPT in just a few clicks.

Why Delete Your ChatGPT Chats?

According to marketing experts like Neil Patel and Ann Handley, clarity and simplicity matter most when it comes to online guides. So before we jump into the steps, here’s why people usually delete their ChatGPT history:

  • Privacy protection → Old conversations might include personal or business details you don’t want stored.
  • Decluttering your account → A long list of chats can be distracting and harder to manage.
  • A fresh start → Sometimes you just want to clear everything and begin again with new conversations.
  • Data management → Some users prefer to control what data is stored, especially when using AI tools regularly.

How to Delete All Chats on ChatGPT (Desktop Version)

If you’re using ChatGPT in your web browser, follow these steps:

  • Log in to your ChatGPT account.
  • On the left sidebar, scroll down to the bottom click on your profile and click Settings (gear icon).
  • In the menu that appears, click on Data controls.
  • Look for the option labeled Delete All Chats.
  • Click it, then confirm when asked to proceed.
ChatGPT data control settings
Source: Screenshot taken by the author in ChatGPT

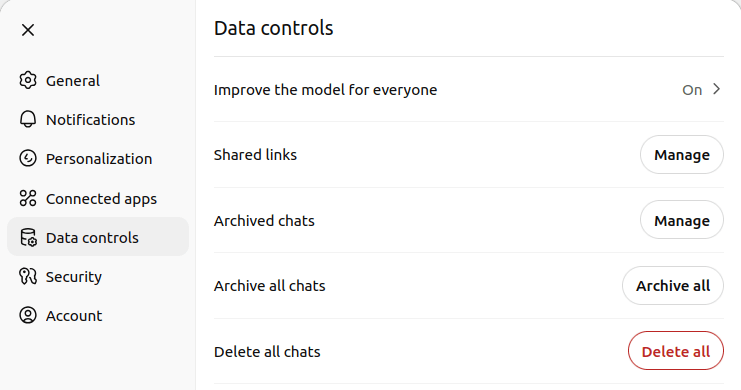
Once confirmed, all your past conversations will disappear immediately.

How to Delete All Chats on ChatGPT (Mobile App)

If you prefer the ChatGPT mobile app (available on iOS and Android), the process is just as easy:

  • Open the ChatGPT app and sign in if necessary.
  • Tap the menu icon (☰) in the top-left corner.
  • Click on your profile name.
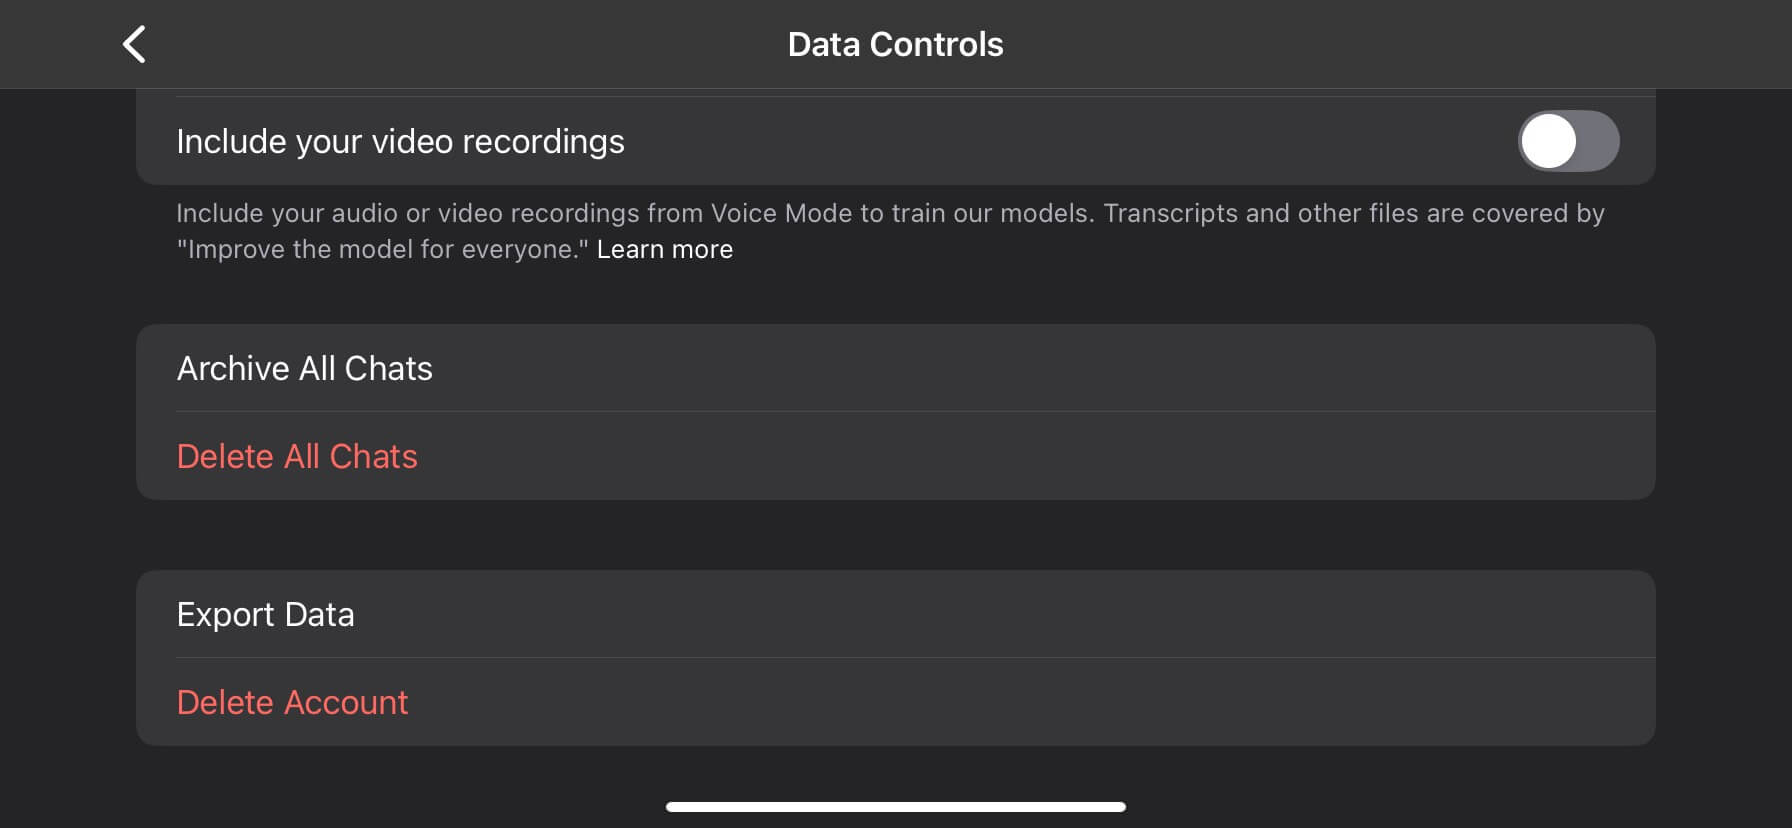
  • Find the Data controls option and click on it.
  • Select Delete All Chats.
  • Confirm the action, and your history will be erased.
ChatGPT mobile data controls
Source: Screenshot taken by the author in ChatGPT mobile app

This removes your chats from all devices linked to your account — meaning if you delete them on mobile, they’ll also be gone from desktop.

What Happens When You Delete All Chats?

Before you clear your history, it’s good to know what happens behind the scenes:

  • The deletion is permanent → Once removed, your chats cannot be recovered.
  • Export your history first → If you want to save your old conversations, go to Settings → Data Controls → Export Data. You’ll receive a file with your chat history by email.
  • It doesn’t affect your account → Deleting chats does not delete your account or subscription. It only clears the list of conversations.
  • Your preferences remain → Settings like themes, login info, or subscription details will stay the same.

Alternatives to Deleting All Chats

If you don’t want to remove everything, you can:

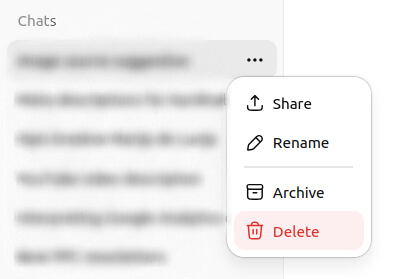
  • Delete individual chats → On desktop, hover over a conversation in the sidebar and click the trash icon. On mobile, swipe left on the chat and tap Delete.
ChatGPT single chat delete
Source: Screenshot taken by the author in ChatGPT
  • Turn off chat history → Go to Settings → Data Controls → Chat History & Training. Turning this off means new conversations won’t be saved.

This way, you can manage your history without wiping everything at once.

FAQs

Can I recover deleted ChatGPT chats?
No. Once you clear your chats, they’re permanently deleted. If you want to keep them, use the Export Data option before deleting.

Does deleting chats improve performance?
Not really. Deleting chats won’t make the app faster, but it does help with organization and privacy.

Can I delete chats without affecting my subscription?
Yes. Whether you’re on the free plan or ChatGPT Plus, deleting chats only removes conversations, not your account or billing details.

Can I delete chats from just one device?
No. When you delete chats, they disappear from all devices linked to your account.

Is there an option to auto-delete chats?
Currently, no. You’ll need to manually delete them or turn off chat history to prevent future saving.

Monetize on Tiktok

How to Register on TikTok to Get Paid

So you’ve heard people are making money on TikTok through something called the Creator Rewards Program, but nobody actually explains how to sign up for it. Let’s fix that.

Here’s exactly how to register, what you need, and what happens next.

First, What Is the Creator Rewards Program?

Quick background: TikTok killed the old Creator Fund in 2024 and replaced it with the Creator Rewards Program. It pays way better (like 10-20x more), but the requirements are higher.

You get paid based on views of videos over 60 seconds. The rate varies from $0.40 to $8.00 per 1,000 views depending on engagement and originality.

Can You Even Apply? Check These Requirements First

Before you waste time setting up, make sure you qualify:

The non-negotiables:

  • 18 years or older
  • 10,000 authentic followers (bought followers don’t count)
  • 100,000 genuine video views in the last 30 days
  • Videos must be over 60 seconds
  • Account must be 30+ days old
  • Living in an eligible country

Eligible countries (as of 2025): US, UK, France, Germany, Japan, South Korea, and Brazil. That’s it. If you’re not in these countries, you can’t join the program yet.

Don’t have 10,000 followers yet? Keep reading anyway—you’ll want your account set up correctly from day one.

Setting Up Your Account the Right Way

Step 1: Create a Personal Account (Not Business)

This is crucial. Business accounts are excluded from the Creator Rewards Program.

  • Download TikTok
  • Sign up with your email (you’ll need access for verification)
  • Choose “Personal Account” when asked
  • Enter your real birthdate (they verify you’re 18+)

Step 2: Verify Your Account

Before you can register for monetization:

  • Go to Settings → Account → Verification
  • Submit your phone number
  • Complete email verification
  • This prevents issues later when applying

Step 3: Set Your Account to Public

Private accounts can’t monetize. Period.

  • Settings → Privacy → Private Account (toggle OFF)

The Actual Registration Process

Once you meet all requirements, here’s how to apply:

Step 1: Find the Application

  • Tap your profile icon
  • Hit the menu (three lines) in the top right
  • Go to “Creator tools”
  • Select “Creator Rewards Program”

Not seeing it? Either you don’t meet requirements yet, or you’re not in an eligible country.

Step 2: Complete the Application

You’ll need to provide:

  • Legal name (must match tax documents)
  • Address
  • Tax identification number (SSN in US, similar in other countries)
  • Date of birth (again)
  • Phone number verification

Step 3: Tax Information

This is where people get stuck. You MUST complete tax forms:

  • US residents: W-9 form
  • Non-US residents in eligible countries: W-8BEN form
  • Everything must match exactly—any mismatch = rejection

Step 4: Payment Method Setup

Choose how you want to get paid:

  • PayPal (most common, available everywhere)
  • Direct deposit (US only)
  • Payment provider options vary by country

Minimum payout is $10. Payments process monthly.

Step 5: Wait for Approval

Takes 24-48 hours usually. You’ll get a notification in the app.

If rejected, it’s usually because:

  • Fake followers detected
  • Previous community guideline violations
  • Tax info doesn’t match
  • Account age or view requirements not actually met

What Happens After You’re Approved?

Your dashboard shows:

  • Estimated earnings (updates daily)
  • View counts for eligible videos
  • Performance metrics
  • Payment history

Important: Only videos created AFTER approval count for payment. Your old viral videos don’t earn retroactively.

Common Problems and Fixes

“I don’t see the Creator Rewards option”

  • Double-check you have 10,000 followers
  • Verify your 30-day view count (Settings → Analytics)
  • Make sure your account is 30+ days old
  • Confirm you’re in an eligible country

“My application was rejected”

  • Review your tax information for typos
  • Check if any videos violated guidelines
  • Ensure followers are authentic
  • Wait 30 days and reapply

“I’m approved but not earning”

  • Remember: only NEW videos over 60 seconds count
  • Check if your videos are being marked as “not original”
  • Low-quality or repetitive content earns less
  • Engagement matters more than just views

Getting into the program is just step one. Most creators in the program earn $20-200 monthly, not thousands. The people making serious money combine this with other income streams.

But hey, getting paid anything for videos you’re already making? Not a bad deal.

The program isn’t going anywhere, and requirements might actually get easier over time. Set yourself up right from the beginning, and you’ll be ready when you hit those numbers.

Instagram login

How to Log In to Instagram (Beginner’s Guide)


If you opened Instagram for the first time and froze at the login screen — relax. This guide shows the exact paths to sign in on phone and desktop, explains modern options like passkeys and 2FA, and gives no-nonsense fixes for the problems people actually hit.

Step 1 — Open the official Instagram app or website

On mobile: open the Instagram app you downloaded from the App Store or Google Play. On desktop: go to instagram.com/accounts/login. Don’t use sketchy third-party apps or random downloads, they’re a common source of scams. (Yes, this happens.)

Step 2 — Pick the right login method

Instagram lets you sign in with:

  • Phone number (the one you registered)
  • Email address
  • Username
  • Linked Facebook account (if your accounts are connected in Accounts Center)

If you can’t remember which you used, try email first — it’s the most common. If that fails, try username or phone next.


Step 3 — Enter credentials (or use passkey)

Type your email/phone/username and password, then tap Log in.

Reality check about passwords: if your password is short or reused across services, stop and fix that. Reused passwords are the main way accounts get taken over. Use a password manager and unique passwords. If Instagram offers a passkey/passwordless option on your device, it’s generally safer and faster — consider switching to it when available.

Step 4 — Complete verification (2FA) if asked

Instagram may ask for a one-time code sent via SMS, email, or generated by an authenticator app. Enter it to finish the login. Two-factor authentication (2FA) makes account takeovers much harder — enable it from Settings → Accounts Center → Password and security.

Step 5 — Post-login: quick safety checks

  • Turn on Two-Factor Authentication (authenticator app is better than SMS).
  • Confirm the email and phone on your account are current.
  • If you see unfamiliar devices in your account, log them out and change your password immediately.

Short FAQ

Q: Can I log in with Facebook?
A: Yes — if your Facebook and Instagram are linked in Accounts Center you can use Facebook credentials to sign in.

Q: What’s better — SMS 2FA or an authenticator app?
A: An authenticator app (or passkeys/hardware keys) is more secure than SMS because SMS can be intercepted. Use an app if you can.

Q: What are passkeys? Should I use them?
A: Passkeys are passwordless credentials tied to your device (biometric or PIN). They’re more resistant to phishing and often faster — use them where supported, but keep a fallback method while adoption finishes.

Tiktok Login

How to Log in on TikTok (Step-by-Step Beginner’s Guide)

If you just installed TikTok and are staring at the home screen wondering how to get inside, this short guide is for you. We show the exact steps to log in (mobile and desktop), sprinkle in security and troubleshooting tips, and keep everything simple — no fluff.


Step 1 — Open TikTok (mobile or desktop)

Open the official TikTok app (App Store or Google Play) or go to www.tiktok.com on a browser. Only use the official app/site to avoid fake apps or phishing attempts.
Beginner tip: If you downloaded from anywhere else, delete it and reinstall from the official store.

Step 2 — Tap Log In

On mobile the login option is on the home screen. On desktop it’s usually in the top-right corner. Make sure you pick Log In — tapping Sign Up will start account creation instead.

Step 3 — Pick your login method

TikTok lets you sign in with:

  • Phone number
  • Email address
  • Username
  • Linked accounts (Apple, Google, Facebook — whichever you used originally)

If you can’t remember which one you used, try your email first (most people sign up with email). This step is simple, but picking the right method saves time.

Step 4 — Enter your credentials and hit Log In

Type your email/phone/username and your password. Press Log In.
Security tip: Use a strong password (12+ characters, mix of upper/lowercase, numbers, symbols). Consider a password manager — it’s the practical way to keep unique, strong passwords for every account. This is a small step that avoids big headaches later.

Step 5 — Complete verification (if requested)

TikTok may send a one-time code to your phone or email. Enter it when prompted. This is normal — it keeps your account secure. If you don’t get a code, check spam for email or make sure your phone number is correct.

Step 6 — Post-login checks & quick setup

  • Turn on Remember me on your private device to speed future logins.
  • Check your Profile → Settings → Security to enable two-factor authentication (2FA) if you want extra safety.
  • If you used a social login (Google, Apple), make sure those accounts are secure too.

Troubleshooting — common login problems & fixes

  • Forgot password: Tap Forgot password? and follow reset instructions by email or phone.
  • Account not found: Try alternate methods (phone vs email). You might have multiple accounts.
  • No verification code: Wait a few minutes, check spam, or request a new code. If that fails, try a different verification method.
  • Still stuck: Use TikTok Help in the app or the official Help Center (search “TikTok login help”).

Facebook Login

How to Log In on Facebook — A Simple Beginner’s Guide


If you’ve just installed Facebook (or opened the site) and hit the login screen, this guide is for you. I’ll walk you through every practical path to sign in — mobile and desktop — explain the newer, safer options (like passkeys), and give quick fixes for the errors that trip beginners up.

Quick steps

  1. Open the Facebook app or visit facebook.com/login.
  2. Tap Log In and enter your email or phone number plus password.
  3. If Facebook asks, enter the verification code sent to your email or phone.
  4. Optionally set up passkeys or two-factor authentication for stronger security.

Step 1 — Open the official Facebook app or website

Use the official Facebook app from the Apple App Store or Google Play, or go to facebook.com/login in your browser. Don’t use copies or third-party apps — only official clients guarantee proper security and recovery options.

Tip: If your phone offers Face ID or fingerprint unlock for apps, use it only on a personal device.

Step 2 — Choose the right login field

On the login screen you can sign in with:

  • Email (any email associated with the account)
  • Phone number (the number you added to the account)
  • Username (if you set one)
    Type whichever you registered with and then your password. If your login doesn’t work, try the other options — many people forget whether they used phone vs email.

Step 3 — Enter your password and tap Log In

Type your password and hit Log In. If the password is correct, you’ll be taken to your News Feed.

Security tip: Use a long, unique password and a password manager. Password reuse is how most account takeovers happen. If you reuse passwords, expect trouble. (This is the simple reality — fix it.)

Step 4 — Complete verification (if required)

Facebook may send a one-time code to your email or phone. Enter that code to finish logging in. If you don’t receive it, check spam, and then request a new code or try a different recovery option from the login help page.

Newer option: Passkeys (passwordless login)

Facebook now supports passkeys — a stronger, easier alternative to passwords on mobile devices. Passkeys let you log in with your device biometric (Face ID, fingerprint) or PIN instead of typing a password. If you can, set a passkey: it’s safer against phishing and credential theft and makes login faster.

Practical note: Passkeys are rolling out by device/region; desktop support is different from mobile. Keep the traditional password/2FA as a fallback until passkeys are available on all platforms you use.

Short FAQ

Q: Can I log in with Facebook using Google or Apple?
A: Facebook supports passkeys, security keys, and traditional email/phone/password. Social logins like Google are not the standard Facebook login path — use the option you registered with.

Q: Is passkey safer than a password?
A: Yes — passkeys are device-based cryptographic credentials that can’t be phished like typed passwords. They’re more secure and more convenient on supported devices.

Q: Should I use “Remember me”?
A: Only on personal devices. Never on shared or public machines.

GSC average position

Why Average Position in Google Search Console Can Be Misleading

For many marketers and business owners, the “Average Position” metric in Google Search Console (GSC) seems like an easy way to measure SEO progress. A lower number looks better. A higher number looks worse. Simple, right?

Not quite.

In practice, this metric can be highly deceptive and lead you to draw the wrong conclusions—especially when viewed without context. Let’s break down why that happens, using two practical examples from real SEO agency work.

FB profile or page for a company?

We still come across entrepreneurs, small businesses — and even some bigger ones — using personal profiles instead of proper company pages on Facebook and LinkedIn.

Please don’t do this.

It not only looks unprofessional, but also hurts your credibility and limits your visibility. Company pages exist for a reason — they build trust, allow you to run ads properly, and help people take your business seriously.

Before jumping into social media, consult someone who understands digital strategy. Don’t let a basic social media marketing mistake undermine everything else you’re doing right.

log file SEO

Unlocking SEO Insights Through Log File Analysis

When it comes to technical SEO, log file analysis is one of the most underutilized yet powerful methods for uncovering how search engines interact with your website. Unlike data from analytics or SEO tools that offer interpreted insights, log files provide raw, unbiased records of every request made to your server — including those from search engine bots like Googlebot.

seo title

The SEO Power of a Perfect Title: Boosting Visibility and Engagement

When people think about SEO, they often focus on backlinks, keywords, or site speed. But one of the simplest and most overlooked elements on your page might be costing you both traffic and conversions: your title tag.

A well-crafted title doesn’t just help you rank—it helps you get clicked. And in today’s competitive search environment, being visible isn’t enough. You need to grab attention, earn the click, and set the right expectation for your visitors. That’s where a perfect title tag comes in.

What Is a Title Tag, Really?

The title tag is the clickable headline you see in Google search results. It also appears at the top of browser tabs and is often what gets pulled when someone shares your page on social media.

It’s not just for show. Google uses the title tag to understand what your page is about. And users rely on it to decide whether your page is worth their time.

In other words, your title tag is a ranking factor, a conversion trigger, and a UX cue—all in one.

Why the Title Tag Matters for SEO

Search engines use the title tag as one of the signals to determine what your page should rank for. While it’s not the onlyon-page factor, it’s one of the strongest. A well-optimized title:

  • Includes your primary keyword naturally
  • Reflects the page content accurately
  • Helps search engines match your page to the right search intent

But here’s the thing: ranking on the first page isn’t the end goal. Getting clicked is.

How a Great Title Tag Boosts CTR

CTR (click-through rate) is the percentage of people who see your result and actually click it. While Google doesn’t confirm it directly, there’s strong evidence that higher CTRs can improve rankings over time.

A compelling title can:

  • Spark curiosity
  • Promise a clear benefit
  • Stand out from other results on the page

Here’s an example:

Boring title: “Best Hiking Trails in Serbia”
Better title: “10 Best Hiking Trails in Serbia (With Maps & Local Tips)”

The second one promises more value and speaks directly to what a searcher might want—details, local insights, and convenience.

The UX Connection: Setting the Right Expectations

A great title isn’t just about getting the click—it’s about keeping the user satisfied. If your title promises one thing and your content delivers something else, visitors bounce. That’s bad for user experience and bad for SEO.

Google wants to show results that:

  • Match search intent
  • Satisfy users’ needs
  • Keep users engaged

So the perfect title tag isn’t just clickbait. It’s a clear, honest preview of the value your content offers.

Tips for Writing the Perfect Title Tag

  1. Include your target keyword, preferably near the beginning
  2. Keep it under 60 characters to avoid being cut off in search results
  3. Make it specific, not vague
  4. Add emotional or benefit-driven words, like “how,” “best,” “easy,” “proven,” etc.
  5. Avoid duplicate titles across your site
  6. Test and tweak—if your CTR is low, try a different approach

Title Tags and Search Visibility: Getting Seen Before Getting Clicked

Before users can click your page, they first need to see it — and the title tag plays a major role in that visibility. A strong title helps search engines better understand your content, which increases the chances of appearing for relevant queries. When your title aligns closely with search intent, your page is more likely to surface in competitive results, featured listings, and long-tail searches. In short, a well-optimized title doesn’t just improve rankings — it expands your search footprint.

Visibility Beyond Google: Titles as a Multi-Channel Asset

Title tags don’t only affect Google rankings — they also influence visibility across multiple platforms. Your title often becomes the default headline when a page is shared on social media, messaging apps, or browser previews. A clear, engaging, and keyword-rich title improves how your content appears in these environments, helping it stand out in crowded feeds and link previews. This means a great title tag doesn’t just boost SEO — it strengthens your brand’s visibility across the wider digital ecosystem.